
Thank you so much for stopping by! If you arrived here via Pinterest or another site, please note that this post has been updated as of June, 2014 in order to showcase our NEW calendar pages! The post below will highlight some of the great features of our Large Planner Pages, as well as provide detailed print instructions with screen shots and step-by-step directions.
*******
There are so many things I love about our Large planner pages. For one thing, finding a binder or cover is SO simple and SO inexpensive, especially when you consider all the fabulous 3-ring binder options available. Target has the cutest line by far, and the binders run as low as $5.
But if a standard 3-ring binder is not what you are looking for, then I highly recommend checking out the Arc System or Martha Stewart Discbound System from Staples. I've been a fan of these binders since I discovered them over a year ago and they are still my favorite, especially for the 8.5 x 11 size.
Another thing I love about our Large planner pages, in addition to all the fabulous WRITING SPACE, is how easy they are to print!! There is no cutting involved and because most of the free printables you find online and in our shop are designed for 8.5 x 11 paper, you can build your perfect planner with very little effort.
To get started, you need to decide which of our Large planner sets best suit your needs. If you are looking for a planner with dated monthly and weekly pages, or if you are simply looking for a planner that is already in order for front-to-back printing (and super easy to have printed and bound for you), our Large Seasonal Planner is for you.


* You will notice in the below picture that selecting "Borderless" will make it so the colors of the page bleed to the edges, giving you the best alignment and use of space. If you do not see the "Borderless" option in your menu, there is a good chance your printer does not allow "Borderless" printing, but before ruling it out completely, we encourage you to Google your printer make and model to see if the option is located somewhere else.
* Next, under "Paper Type" you will want to select "Plain Paper." Many printers, once borderless printing is selected, will default to "Photo Paper." Although this will give you beautiful vibrant color, it will use 3 times as much ink and take twice as long to print. Be sure that you select paper type AFTER selecting borderless printing.

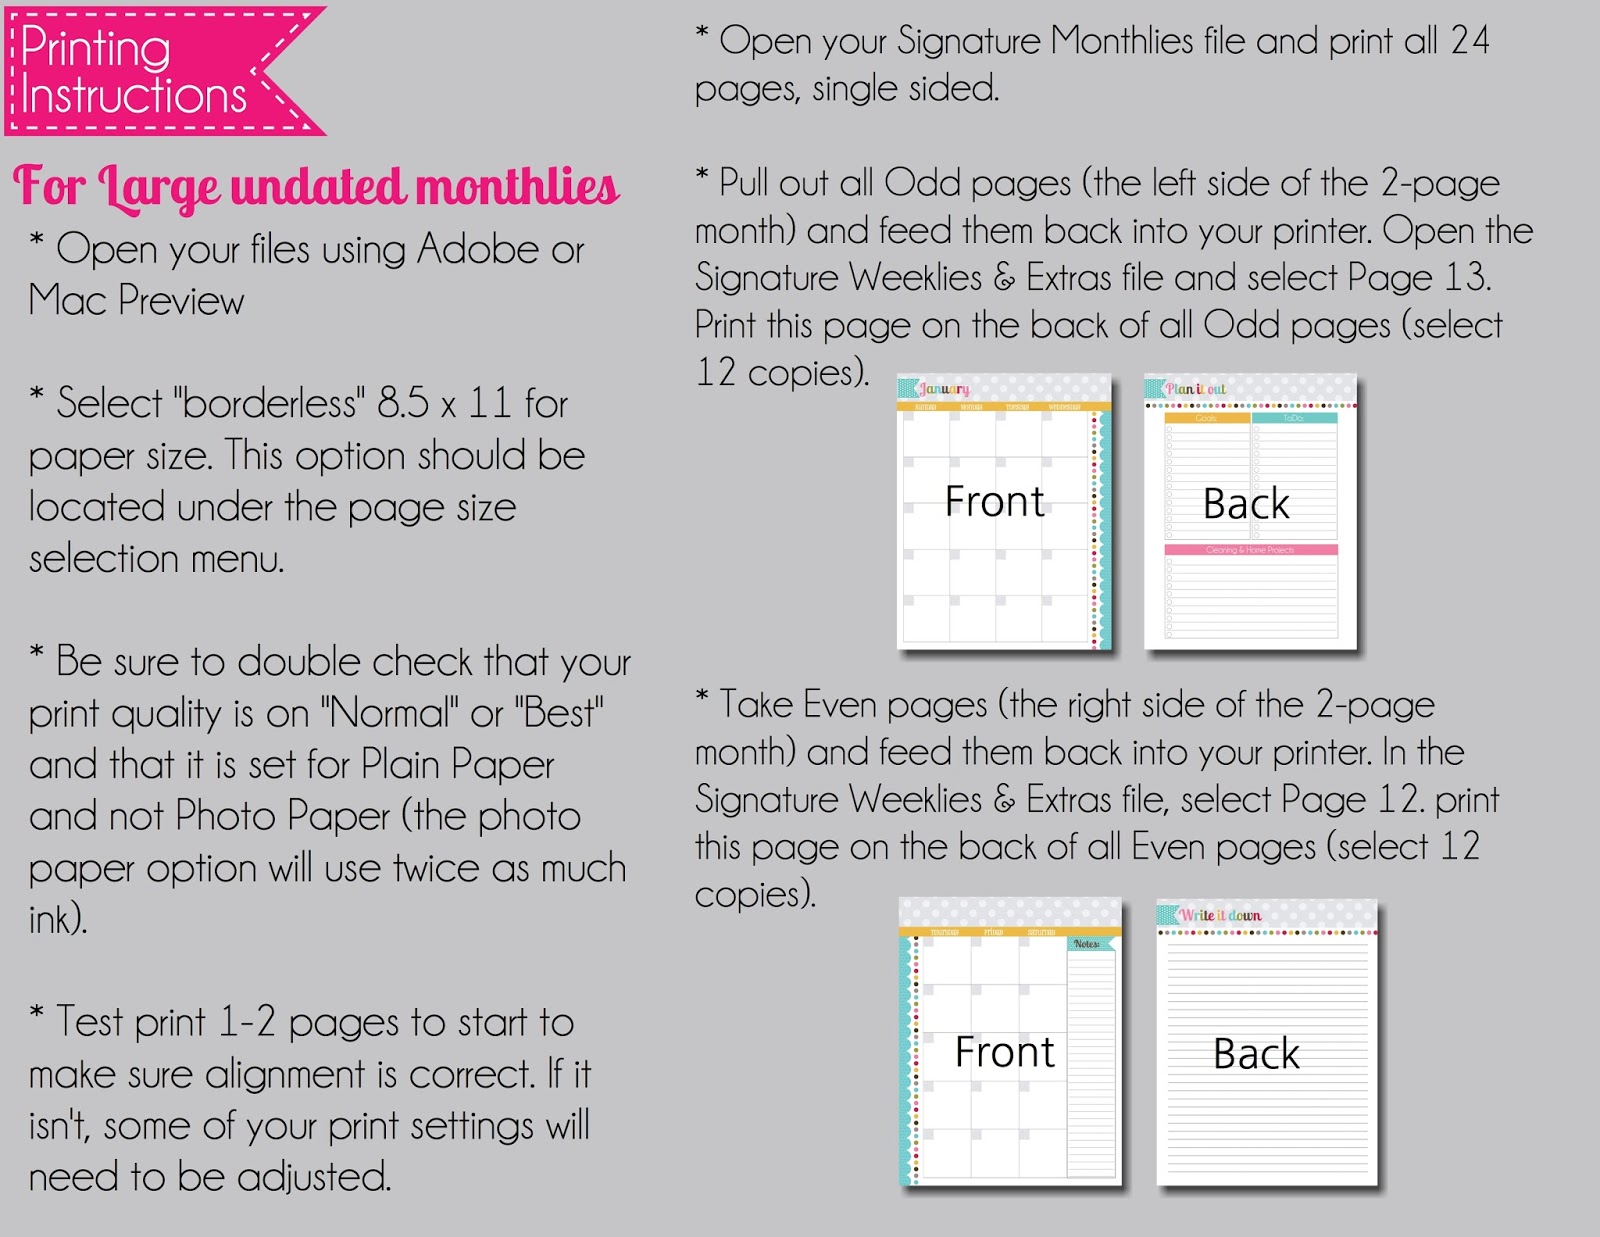
* {Please skip this step if your printer allows you to select "Duplex Printing"} In order to save space in your planner, these pages are designed to be printed front-to-back and are already arranged in sequential order. If your printer does not have the option to print front-to-back automatically, then we suggest the odds/evens print method.
* First, select "Paper Handling" from your drop down menu

From there, select "Odd Only"

And then be sure to select "Normal" order.

* BE SURE TO KEEP PAGES IN THE EXACT ORDER THEY CAME OUT OF THE PRINTER. You may feel the need to clear the tray as the pages print but it is important they stay in a stack.
* Once all of the odd pages have been printed, feed the stack back into your printer {pay close attention to how your printer feeds paper so that you know which direction to put them back in}.
* Once again, select "Borderless", "Plain Paper" and then under "Paper Handling" choose "Even Only"

And "Reverse" order

* DO NOT LEAVE THE ROOM WHILE YOUR EVEN PAGES PRINT. I can't stress this enough. I have messed up several planner sets of my own because my printer pulled an extra sheet through the feed. If this happens and goes unnoticed, all of the pages following that extra sheet will be out of order and you will have to reprint those pages again on BOTH sides.
* But if you watch carefully, and all pages print as they should, you will have your Seasonal Planner all set up in no time!
As I sad above, this planner is by the far the easiest to print because all the pages are print-ready and in order. And even though our Signature and Simplistic pages are a little more time-consuming to print, they offer an incredible amount of flexibility and variety.


As you can see, these sets come with 4 different weekly options, as well as a daily page that can be used all year, or just on days when you have a lot to juggle. There are also monthly pages, journal pages, list pages, notes and a standard cover sheet. With so many layout options, you are sure to find a system that works best for you. And because these planners are undated, they can be used year after year and you can change your set-up as you need to.
But with this flexibility comes a little more work in the print department. These sets will come with print instructions included in your Instant Download file, but in case you misplace them or want to see how they all work before you purchase the set, here is a look at:
HOW TO PRINT OUR LARGE
UNDATED SIGNATURE PLANNER PAGES
*******
There are so many things I love about our Large planner pages. For one thing, finding a binder or cover is SO simple and SO inexpensive, especially when you consider all the fabulous 3-ring binder options available. Target has the cutest line by far, and the binders run as low as $5.
But if a standard 3-ring binder is not what you are looking for, then I highly recommend checking out the Arc System or Martha Stewart Discbound System from Staples. I've been a fan of these binders since I discovered them over a year ago and they are still my favorite, especially for the 8.5 x 11 size.
Another thing I love about our Large planner pages, in addition to all the fabulous WRITING SPACE, is how easy they are to print!! There is no cutting involved and because most of the free printables you find online and in our shop are designed for 8.5 x 11 paper, you can build your perfect planner with very little effort.
To get started, you need to decide which of our Large planner sets best suit your needs. If you are looking for a planner with dated monthly and weekly pages, or if you are simply looking for a planner that is already in order for front-to-back printing (and super easy to have printed and bound for you), our Large Seasonal Planner is for you.
TO PRINT OUR LARGE SEASONAL PLANNER:
* Be sure that you have a fresh ink cartridge in your printer and that you have your paper tray filled. I prefer 24 - 28lb paper. It has a nice texture and your pens and fine tipped markers won't bleed through.
* After you have purchased and downloaded your file, open it using either Adobe Reader or Mac Preview (I will be using Mac Preview for the following instructions, but many of the options are universal).
* Click on the "Paper Size" menu and select "US Letter" and/or "Borderless" 8.5 x 11 in.
* You will notice in the below picture that selecting "Borderless" will make it so the colors of the page bleed to the edges, giving you the best alignment and use of space. If you do not see the "Borderless" option in your menu, there is a good chance your printer does not allow "Borderless" printing, but before ruling it out completely, we encourage you to Google your printer make and model to see if the option is located somewhere else.
* Next, under "Paper Type" you will want to select "Plain Paper." Many printers, once borderless printing is selected, will default to "Photo Paper." Although this will give you beautiful vibrant color, it will use 3 times as much ink and take twice as long to print. Be sure that you select paper type AFTER selecting borderless printing.
* {Please skip this step if your printer allows you to select "Duplex Printing"} In order to save space in your planner, these pages are designed to be printed front-to-back and are already arranged in sequential order. If your printer does not have the option to print front-to-back automatically, then we suggest the odds/evens print method.
* First, select "Paper Handling" from your drop down menu
From there, select "Odd Only"
And then be sure to select "Normal" order.
* BE SURE TO KEEP PAGES IN THE EXACT ORDER THEY CAME OUT OF THE PRINTER. You may feel the need to clear the tray as the pages print but it is important they stay in a stack.
* Once all of the odd pages have been printed, feed the stack back into your printer {pay close attention to how your printer feeds paper so that you know which direction to put them back in}.
* Once again, select "Borderless", "Plain Paper" and then under "Paper Handling" choose "Even Only"
And "Reverse" order
* But if you watch carefully, and all pages print as they should, you will have your Seasonal Planner all set up in no time!
As I sad above, this planner is by the far the easiest to print because all the pages are print-ready and in order. And even though our Signature and Simplistic pages are a little more time-consuming to print, they offer an incredible amount of flexibility and variety.
As you can see, these sets come with 4 different weekly options, as well as a daily page that can be used all year, or just on days when you have a lot to juggle. There are also monthly pages, journal pages, list pages, notes and a standard cover sheet. With so many layout options, you are sure to find a system that works best for you. And because these planners are undated, they can be used year after year and you can change your set-up as you need to.
But with this flexibility comes a little more work in the print department. These sets will come with print instructions included in your Instant Download file, but in case you misplace them or want to see how they all work before you purchase the set, here is a look at:
HOW TO PRINT OUR LARGE
UNDATED SIGNATURE PLANNER PAGES

HOW TO PRINT OUR LARGE
UNDATED SIMPLISTIC PLANNER PAGES


I know these printing instructions may seem overwhelming, but I hope that you will find them useful as you begin to set up your new planner. My best advice is to go into the project knowing that it will take some time, as all great projects do, but the end result will hopefully be a planner that you look forward to using every day :-)
And while your printer is still warmed up, be sure to browse our shop {and blog} for other great sets and extras that will fit in your Large planner! You can use the following links to learn more about each set:
And of course, don't forget all the fabulous FREEBIES we have under the "Planner Pages" tab above. We have a whole set of Home Management Printables, Holiday Printables, List pages and more! And we are constantly adding new pages to our blog so be sure to follow us here, Facebook, Twitter and Instagram!
******
As you can see, we have done our very best to provide detailed print instructions, but please keep in mind not all printers are created equal and there are some print problems even we can't solve. But that doesn't mean we aren't willing to try…so please feel free to email us with any questions at all.
thepolkadotposieprintables{at}gmail{dot}com.
Happy Planning, Friends!!